How To Set Up ZoomInfo Salesforce Integration and Key Benefits
By Sakshi Arora
Jun 28, 20215 min read
“We shape our tools and afterwards our tools shape us”. - Marshall Mcluhan
Salesforce is a tool that has made CRM and marketing technology easier for every marketer. It serves enterprises of all sizes and comes at a competitive price.
The biggest advantage of working with Salesforce is that it allows you to integrate many supporting technologies and tools, giving you more control over various CRM functions.
ZoomInfo is a tool that you can integrate with Salesforce easily to add great value to your CRM capabilities. Any B2B marketing team will love to have a resource in the form of Salesforce ZoomInfo integration that can feed the information related to prospective customers and key decision makers.
ZoomInfo is a Global Intelligence Tool, which enables the sales and marketing teams access to opportunities and prospects’ information accurately.
As per Salesforce, ZoomInfo integration provides you with several benefits.
Key Benefits of Salesforce ZoomInfo Integration
- With ZoomInfo Salesforce integration, your sales and marketing teams can find new unexplored prospect accounts in the target market and instantly identify decision-makers and other key stakeholders.
- Your team gets access to verified direct-dial phone numbers and email addresses. They can easily identify discrepancies between Salesforce and ZoomInfo powered by DiscoverOrg records in real-time, and manually update data selectively or in bulk.
- You can access practical, predictive intelligence, and improved and personalized conversations bundled with insights about news, projects, installed technologies, initiatives, company attributes, and personnel changes. It helps marketing teams in taking the right decisions at the right time and place, resulting in effective communication and improved lead quality.
Thus, ZoomInfo Salesforce integration gives an edge to your marketing teams and helps gain more quality leads at the top of the funnel.
In fact, it also assists sales teams in understanding what's happening with the leads, their preferences and pain points thereby helping them in closing more deals.
Now, let us see how you can integrate ZoomInfo with your existing Salesforce account.
Before we start, all users who wish to do this must confirm with their Salesforce Admin that the Rest API has been enabled in the back end of Salesforce.
Steps to Follow for Successful Salesforce ZoomInfo Integration
Step 1: Log in to ZoomInfo.
Step 2

Click on the admin/profile name on the top right; select Settings from the drop-down menu.
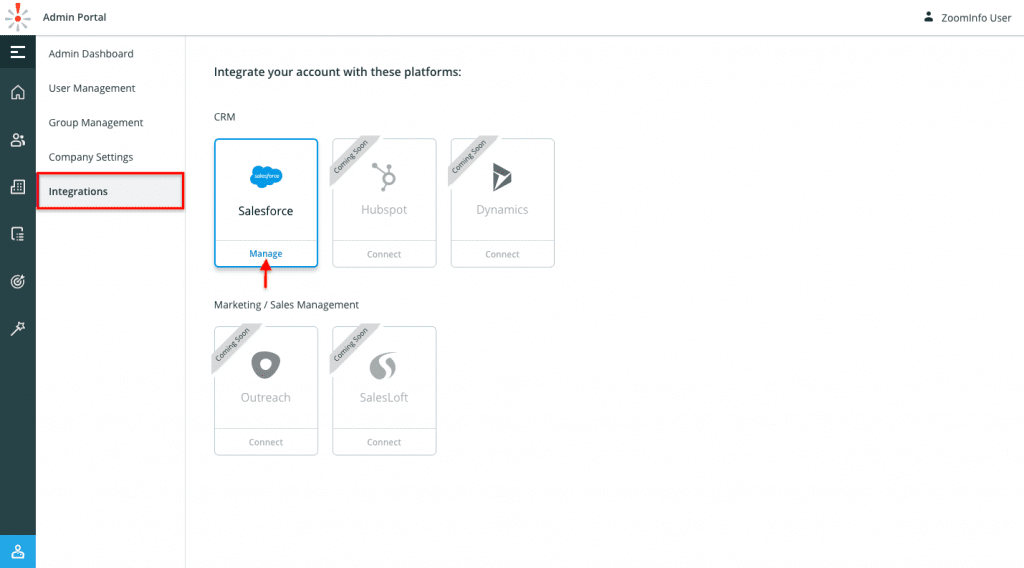
Step 3: Navigate to the Integrations button on the left and find the options available for integration such as Salesforce, HubSpot, Dynamics, Outreach, and SalesLoft. Select ‘Connect’ under the Salesforce option.

Step 4 : Here, you can choose. Either connect to a Production (Live) environment or to a sandbox environment (typically used for testing). Then, click ‘Connect’ to move ahead.

Step 5 : Once we complete the above-mentioned actions, a new window will open, asking you to sign in with your Salesforce credentials.

Note: Make sure that you have pop-up blockers disabled on your current browser in order to see this window.
Step 6: After you enter your Salesforce credentials, you will receive a notification stating that ZoomInfo has been integrated successfully with your Salesforce account.
And you are done!
With the ZoomInfo plugin for Salesforce, you will have achieved more power and efficiency.
Trouble Connecting? A Few Points to Troubleshoot
The Salesforce Rest API is included as a default with a few versions only. It is included with Force.com, Enterprise, Developer, Performance, and Unlimited Editions Only. If you have any other version of Salesforce, you need to purchase the access with the help of your Salesforce Account Manager.
If you do not have the Rest API, you can install ZoomInfo’s native application into Salesforce directly.
Advanced Settings for ZoomInfo Salesforce Integration
Exporting Preferences from ZoomInfo to Your Salesforce Account
Note: Before you start integrating your preferred objects from ZoomInfo to your Salesforce account, confirm that you have completed ZoomInfo Salesforce integration as mentioned in the steps above.
Steps to determine the objects which you want to export:
- Enter the admin panel and navigate to the integrations tab. Here, select ‘Manage’ under the Salesforce Option.

2. Make sure you are on the General tab & select each given object type you want your users to access by exporting it to Salesforce.

3. Click ‘Save’ and the changes will be reflected for all the users.
Conclusion
You must understand that both Salesforce and ZoomInfo come at a considerable price and that your Salesforce account admin is responsible for a successful integration as well as execution of campaigns to increase the ROI.
Want to get past all the hassles and complete the Salesforce ZoomInfo integration seamlessly? Get in touch with our experts today over a consultation and let our team take over the successful implementation while you focus on more important tasks.
For more information about Salesforce integration and development services, email us at info@growthnatives.com or visit our website.


