How to Best Leverage Pardot Email Preference Center
By Sakshi Arora
Mar 14, 20227 min read
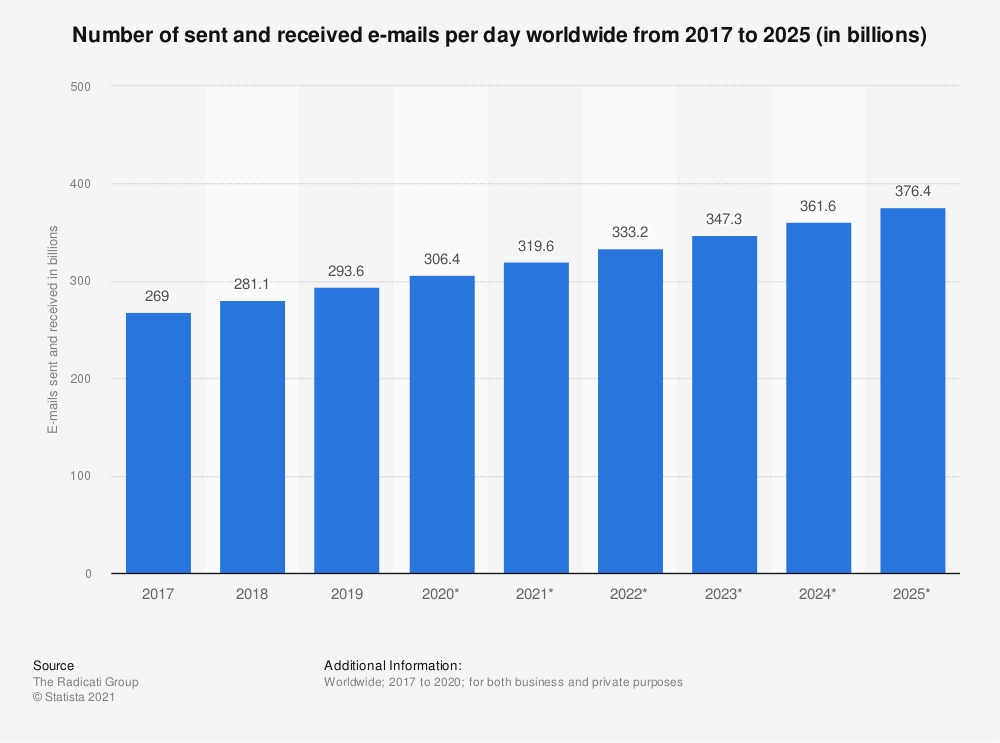
An average of 319.6 billion emails were sent and received every day in 2021 and this number is expected to reach 376.4 billion by 2025. An average email user receives more than 120 emails every day! And given the importance businesses assign to email marketing, it is not surprising.

Your marketing team would spend countless hours to build the database, strategize the email marketing plan, create content, and personalize emails to generate revenue for your business.
Let us take a real-life example. You receive dozens of marketing emails in your inbox daily. Some are from businesses you never signed up for, and you are probably unsubscribing them. However, some are from businesses that you have used in the past. In a typical scenario, you won’t like to receive all their emails and have your preferences.
The same goes for your customers who have their preferences and don’t enjoy being spammed with unrelatable emails every day. Email preference center (EPC) thus becomes important to reach out to your target audience with relatable emails.
Your email marketing campaign must offer users the choice of receiving emails that serve them well. The introduction of the General Data Protection Regulation (GDPR) by the European Union mandates businesses to let consumers decide the kind of marketing messages they would like to receive. Failing to comply can invite a strict penalty. Pardot Email Preference Center from Salesforce can help you resolve this challenge.
What Is EPC and Why Do You Need It?
An email preference center is a simple form that lets your subscribers gain control over the kind of emails they receive from your brand. This is an extension of the traditional ‘Unsubscribe Page’ that email recipients would visit after clicking the unsubscribe button on the bottom of the email. While this page meant losing people from the list, EPC lets you retain them by sending them only relevant business communication as per their preferences.
An EPC lets email recipients have control over:
- How often and when you contact them
- Channels they can be contacted through
- The kind of content they prefer to see
Email preference center is the need of the hour for businesses across industries, given the global concerns for privacy and increasing compliance requirements. Here are some reasons why your brand needs EPC:
- Ensure Compliance and Transparency – GDPR makes it mandatory, and your brand must deploy it. EPC also ensures higher transparency as your subscribers have control over the emails they receive.
- Reduce Unsubscribes - With a small change in the frequency and content of the email, you can retain your subscribers.
- Gather Data - Collect vital data about your subscribers such as their age, gender, income levels, and product preferences.
- Increase Conversions – Targeted emails lead to better engagement with the subscribers and in turn lead to conversion-oriented marketing campaigns.
How to Create EPC and Best Practices?
Pardot is the best tool for creating email preference centers as it is easy to use and allows your subscribers to manage their email list seamlessly. Creating Pardot EPC is a 7-step process and we shall look into these steps and the best practices:
# Step 1 – Start Your Campaign
In the Pardot dashboard, navigate to Marketing > Emails > Preferences Page. Enter the name of the new EPC. Though your subscribers won’t see the name, as a best practice, use a name and title that best describe the campaign and make it easier to manage the EPC in the future.
# Step 2 - Customize Pardot Email Preference Centre Appearance
Customizing the appearance of your EPC is important. It makes the form look legit and lets you create an impression in the minds of your users. Pardot offers you lots of customization and branding options. You can use the Standard Template to get started immediately or create your template using Marketing > Landing Page > Layout Templates > New Layout Template. From the color scheme to the logo, you will have several styling options to explore.
# Step 3 – Set Your Preferences
This is the most important stage in creating EPC. You must organize the preferences depending on the unique needs of your business. For instance, if you are building EPC for an ecommerce store, your likely preferences shall include:
- Product Updates
- New Offers
- Seasonal Sale
- Newsletters
In the past, users could use Pardot EPC in several ways, but since GDPR came into effect, users can access your brand EPCs by using a direct link to the Pardot email and with an email address field that cannot be edited. It is important to set these preferences to comply with the regulations.
# Step 4 - Build Public Lists
Public lists let you categorize prospects together in buckets based on common factors. This ensures your marketing emails are reaching the right category of people. Depending on your need, you can create static and dynamic lists. In the case of static lists, you will need to add prospects manually or using automation. Dynamic lists, on the other hand, keep adding new prospects using condition-based rules. These lists are preferred as you can keep growing the email list each time your brand engages with a new prospect.
To create lists, you must navigate to Marketing > Automations > Segmentation Lists > Add List. Here, you need to fill in the Name of the list and the Label and Description. You need to check the Public List checkbox. It is important as Label and Description will be visible to prospects and hence, you need to appropriately fill in the details. Once these details are filled in and preferences set, you will be able to generate your email preference page which can be integrated into your list emails, drip programs or engagement studio.
# Step 5 – Give Access to EPC
In this step, you will need to give your prospects and subscribers access to the email preference page. The email preference merge tag comes included in the default template or one you create on Pardot. By adding the {{EmailPreferenceCenter}} merge in place of the {{Unsubscribe}} merge tag or together with it in the emails, you will give subscribers the option to set their preferences instead of unsubscribing from your email completely.
# Step 6 – Testing
If you follow the above steps, you will be able to implement the email preference center using Pardot seamlessly. However, you must run a few steps to ensure that EPC is functioning properly without any glitches. Add a test prospect record to ensure that the {{EmailPreferenceCenter}} appears in the email.
# Step 7 – Documentation
This is the last step in the process and one that is often overlooked. As your business grows and you have a large number of subscribers and prospects, you will need to create multiple EPCs. Documenting each email preference center project is important as this documentation would include details of how the new EPC must be used and how the audience is segmented. This information is vital as it would help you build better EPCs in the future and avoid reinventing the wheel.
Final Thoughts
Pardot Email. Pardot lets you set custom email preferences aligned to the unique needs of your business, making it the go-to tool for creating an EPC. If you are not using email preference centers in 2022, you are not leveraging the true power of your email marketing campaign.
Looking for a team that can help you create your email preference center in Pardot? Growth Natives has you covered. As experts in this domain, we have worked with clients across the globe and can help you unlock the true power of marketing automation. To get started with your campaign and reap the dividends, write to us at info@growthnatives.com or visit our website.


